User Manual
Introduction
The Midian Prime™ is a compact wireless MIDI trigger controller that allows musicians to easily and discreetly trigger tracks, clicks, pad-tones, lights, or other effects during performances. The device consists of two modules: a transmitter module and a receiver module. The receiver module must be plugged into a computer or other device that can receive MIDI signals, such as PCs, Macs, or iPads. The transmitter module can then be clipped to the belt, pocket, or guitar strap of the user.
Quick Start Guide
The Midian Prime™ transmitter and receiver modules come pre-paired. To begin use, plug the receiver module (Figure 1) into your desired MIDI-receiving device using the provided USB-C cable (or other USB 2.0 compatible cable). The module will become discoverable by your computer as a USB device named “Midian Prime.” The LED indicator light on the receiver module should begin to blink slowly. Next, switch on the transmitter module (Figure 2). The LED indicator lights on both the transmitter and receiver modules should turn solid. The transmitter display (Figure 2 Marker 3) should display connection bars (Figure 3). Setup is now complete. Pressing any of the four buttons on the transmitter module (Figure 2 Marker 1) will send a MIDI signal to your computer as long as the receiver module remains plugged in.
Pairing Devices
The Midian Prime™ transmitter and receiver modules are compatible with any other Midian Prime™ transmitter or receiver module.
- To pair a transmitter module with a receiver module with which it has not been pre-paired, plug the receiver module into your desired MIDI-receiving device using the provided USB-C cable (or other USB 2.0 compatible cable). The LED indicator light on the receiver module should begin to blink slowly.
- Next, switch on the transmitter module. The LED indicator light on the transmitter module should also begin to blink slowly.
- Press and hold the outer two buttons on the transmitter module while holding the receiver pairing button (Figure 1 Marker 2). The LED indicator lights on the transmitter and receiver modules should begin to blink quickly. Hold down for at least 3 seconds and release. The LED indicator lights on the transmitter and receiver modules should both turn solid, and the transmitter display should display connection bars. If either LED indicator light fails to turn solid, repeat this procedure. The transmitter and receiver modules have now been paired, and pressing any of the four transmitter buttons will send a MIDI signal to your computer as long as the receiver module remains plugged in.
Pairing Additional Devices
The Midian Prime™ receiver module can also be paired with multiple Midian Prime™ transmitter modules simultaneously.
- To pair an additional transmitter module with a currently paired and operating receiver module, switch on the additional transmitter module. The LED indicator light on the transmitter module should begin to blink slowly.
- Press and hold the outer two buttons on the transmitter module while holding the receiver pairing button. The LED indicator lights on the transmitter and receiver modules should begin to blink quickly. Hold down for at least 3 seconds and release. The LED indicator lights on the transmitter and receiver modules should both turn solid, and the transmitter display should display connection bars. If either LED indicator light fails to turn solid, repeat this procedure. The additional transmitter module has now been paired with the receiver module, and pressing any of the four transmitter buttons will send a MIDI signal to your computer. Any previously paired transmitter module will remain paired to the receiver module and will function as before.
Changing Signal Modes
Not all software applications utilize the same MIDI signals when mapping signals to functions. Therefore, the Midian Prime™ has been designed with three different MIDI modes, each of which send a different type of MIDI signal. If you are having difficulty mapping MIDI functions in your software, we recommend that you try all three signal modes.
- When you first turn on the transmitter, the OLED will display one of the following three letters: ‘N’, ‘C’, or ‘P’. An ‘N’ means that the transmitter is in note mode and will send MIDI on/off notes to your software. A ‘C’ denotes controller mode and corresponds to MIDI controller signals. Finally, a ‘P’ denotes program change mode and corresponds to MIDI program change signals.
- Additionally, each letter will be followed by a number, either ‘1’ or ‘2’. This enables you to use multiple transmitters together without overlapping signals. For example, a transmitter in ‘C1’ can send 8 unique MIDI control signals, and a transmitter in ‘C2’ mode can send another 8 unique control signals. When used together, a total of 16 unique control signals are available.
- While changing modes, the transmitter must not be connected to a receiver. Therefore, we recommend keeping your receiver disconnected during this process.
- To change modes, hold down any two adjacent buttons on the transmitter. If the buttons you are holding correspond to a different signal mode, you should see a flashing letter denoting which signal mode you are about to enter. If the buttons you are holding correspond to the current signal mode, you should see a flashing letter denoting which signal channel you are about to enter. After three seconds, the letter/number will stop flashing. You are now in the new signal mode.
Figures
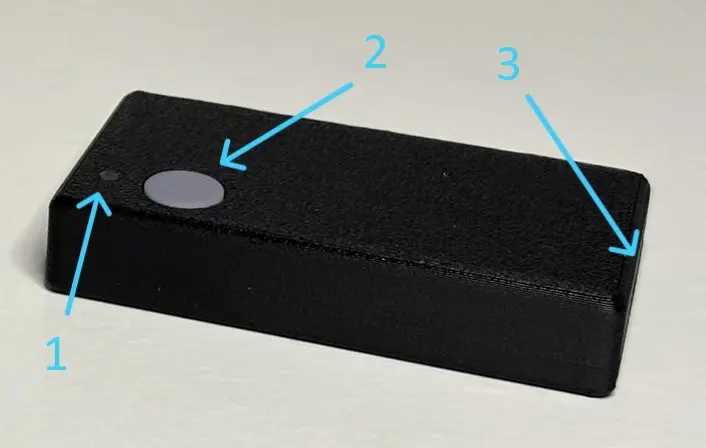
- Marker 1: LED Indicator Light
- Marker 2: Pairing Button
- Marker 3: USB-C Port
- Marker 1: Buttons
- Marker 2: LED Indicator Light
- Marker 3: Display (see Fig. 3)
- Marker 4: Detachable Belt Clip
- Marker 5: Power Switch
- Marker 6: USB-C Charging Port

For more information, visit our FAQ page.